![]()
|
|
Introduction |
PageStream offers three ways to put text on a page: text frames, text blocks, and tables.
Text frames are containers in which text may be entered. Most text frames are rectangular text column frames with one or more columns. Text frames created from irregular shapes are referred to as text shape frames. Text column frames are normally used for the body text of a document and text shape frames are used for special effects. Text frames can be linked together so that text will flow between them. Use text frames for the body text of your documents.
Text blocks are frameless text used for titles, headers, footers and other small blocks of type. They lack defined right and bottom margins, so they don't have fixed edges within which to wrap text. You must press the Return key to end each line of text in a text block. Text blocks cannot be linked to other blocks, frames. or tables.
Tables is a rectangular frame divided horizontally and vertically into cells which contain text. The text flows in each cell like a text frame, only the text can not be linked to another cell, blocks or frames.
![]()
![]()
Text frames, text blocks, and tables can be manipulated as objects
with the Object and Reshape
tool in the same way as shapes created with the drawing tools.
In addition, TextFX paths and table cells may be manipulated with
the Reshape tool.
![]()
The Text tool is used to edit and format text in a text frame,
text block, or table.
Resizing a text frame will cause the text inside to reflow to fill the new dimensions of the text frame. Resizing a frameless text block will cause the size of the text to resize proportionally to the new dimensions of the text block. Resizing a table will cause the cells inside to resize proportionally, and the text inside those cells to reflow to fill the new dimensions of the cell.

Most text is entered into text column frames. This type of text frame can be divided into multiple columns which are permanently linked together. You can change the number of columns in a text column frame at any time.
![]()
![]()
![]()
You can create text frames on multiple pages at once with the
Create Text Frames command, or you can draw a single frame with
the Column tool.
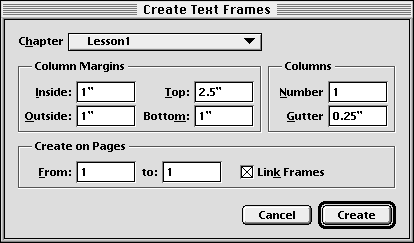
1. Choose Create Text Frames from the Layout menu.
The Create Text Frames dialog box will appear.
2. Select the column options.
Enter the number of columns to create and the gutter space between them. You can also set their margins, the pages on which to create them, and whether or not to link the frames from page to page.
3. Click Create.


1. Select a Column tool from the toolbox.Select the one, two or three column tool. The mouse pointer will change to a drawing crosshair.
Drawing Crosshair Pointer
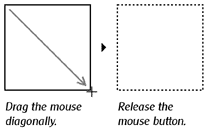
2. Drag the mouse to start the frame.
Position the mouse crosshair over the start point of the frame. Drag the mouse in any direction while holding down the mouse button.
3. Release the mouse button to end the frame.
Depending on which tool is selected it would create a one, two or three text column(s) frame.
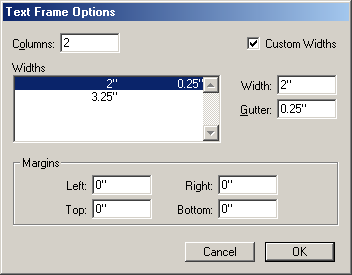
To change the number of columns in a text frame after creating it: Select the frame with the Object tool. Choose Text Frame Options from the Frame submenu in the Object menu to display the Text Frame Options dialog box. Ticking the Custom Widths box will show each of the column widths in the Widths list. Clicking on one of the widths will show the current values in the Width and Gutter text boxes which can be changed to custom values. Changing the number of columns in the Column text box will change the number of columns appearing in the Widths selector box.
Alternatively, enter new values into the Edit palette's #C and G text boxes for text column frames to set the columns to equal widths.
To change the text margin inside the text frame: Select the frame with the Object tool. Choose Text Frame Options from the Frame submenu in the Object menu to display the Text Frame Options dialog box. Enter the left, right, top and bottom margin to leave between the edge of the frame and the inside frame for text. Note: This option only works for rectangular text frames.
Text shape frames are used for special effects. PageStream allows you to convert any shape or path into a text frame. For example, you could draw an ellipse, convert it to a text frame, and then type directly into it. PageStream will treat the shape or path, no matter how irregular, as the margins for the text.
If you join objects together with the Join command and convert the result to a text frame, text will flow into the portions of the path which do not overlap.
The grey portions of the objects above show where text would be placed. The text would be drawn from left to right starting at the top, just as it would in normal text frames.
Note that you cannot convert groups or drawings into text frames, because they are not a single object.
Text shape frames retain all the properties of their original object type. For example, you can continue to edit the arc angles of a pie slice after converting it to a text frame.
To convert a shape or path into a text shape frame: Select the object to convert with the Object tool, and then choose Text Frame from the Frame submenu in the Object menu. This command will be checkmarked when a shape is capable of holding text.Choose None from the Frame submenu to turn off the text container ability of a text shape frame. Note that this will delete the text it contains.
Text frames are useful because the text in them can be word wrapped. Text blocks lack defined right and bottom margins so you must press Return at the end of each line. They are intended for short blocks of text such as titles, captions, TextFX, headers and footers, and cannot be linked together like text frames. On the other hand, you can resize the text in them by resizing the text block's bounding box.
To create a text block: Choose the Text tool and click on a blank area of the page. If you click on another text block or a text frame, the insertion point will be placed in that object rather than creating a new text block. You can click on top of non-text objects to create a text block. The text block will initially have no width. You can begin typing immediately to enter text. Press Return to end each line.
Tables are a special object type that contains text in individual cells that make up the table. The contents of a cell can also be the result of calulcations performed on the numerical values of other cells much like a spreedsheet.
1. Select the Table tool from the toolbox.The mouse pointer will change to a drawing crosshair.
2. Drag the mouse to start the table.
Position the mouse crosshair over the start point of the table. Drag the mouse in any direction while holding down the mouse button.
3. Release the mouse button to end the table.
By default, you will have a four column and four row table. Rows and columns of cells can be deleted and inserted, as well as cell formulas, borders and fills changed with the Reshape tool. The Text tool is used to enter and format text in the cells.
When you resize a text column frame, the text in it reflows without changing the size of the text. The text may or may not fit in the frame's new size. When you resize a text block, the text in it resizes in proportion to the object's new size. Resizing a table will cause the cells inside to resize proportionally, and the text inside those cells to reflow to fill the new dimensions of the cell.
|
|